Motor Design with JMAG-Express
In the latest version of JMAG-Express Public released in July 2013, a DC brush motor calculation function has been added. In this issue, we'll give you an example of an actual motor design utilizing JMAG-Express Public's properties as an example of the DC brush motor functions that were recently added.
What is JMAG-Express Public?
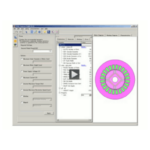
JMAG-Express Public is a free motor design tool that we, JSOL Corporation, provide to motor designers. Simply input geometry dimensions, materials, winding and drive conditions as the design parameters and the motor properties are calculated instantaneously. JMAG-Express Public is extremely convenient for give a rough layout such as an overview design or design for initial stages (Fig. 1).
We have previously dealt with brushless motors, induction motors and switched reluctance motors. In this issue, though, we're going to look at how to respond to DC brush motors.
 Fig 1. JMAG-Express Public Main Screen
The motor's design parameters, which are the geometry, material, winding and drive conditions, can all be set and changed in tabs. Click the Evaluate button for an instantaneous property evaluation. Click Sizing (automatically determines the size) on the left of the screen and this enables you to conduct a sensitivity analysis (design parameter impact analysis.)
Motor Design using JMAG-Express Public
Let's look at how to use the newly incorporated DC brush motor analysis feature to perform an overview design for a motor using JMAG-Express Public. Flow of Motor Design using JMAG-Express Public (Fig. 2).
 Fig. 2 Design Flow using JMAG-Express Public
Decide on the initial stage proposal using the Sizing function and then analyze the parameter that will have the greatest impact through property evaluation and a sensitivity analysis. Continue moving forward with the design, repeating the design change and property evaluation processes.
Decide the motor size instantaneously
In traditional motor design, the motor's rotor diameter D (m) and stack length L (m) would need to be input based on the desired specifications. Estimate thrust force generated in the air gap, the rotor diameter and stack length. In this case, thrust density is needed for things like experience, but there is also a need to achieve balance between the diameter and stack length, but this entails a lot of bother. Using the JMAG-Express Public we're introducing here enables automatic sizing of the motor. JMAG-Express Public has a sizing function and simply setting the desired rated output for a motor, etc. will propose a recommended geometry. Just choose a geometry type first and there is no need for troublesome calculation, with creation instantaneous. So, let's decide the motor size, using JMAG-Express Public's Sizing function to do so. First, decide on the geometry. Freely choose or change rotor and stator arrangements (Fig. 3).
Once you've decided on a geometry type, just input the desired specifications and JMAG-Public Express will propose a motor geometry (Fig. 4).
 Fig. 3 Select Motor Geometry Types
To define a motor geometry, the methods available include using existing motor templates or creating new arrangements using a variety of rotors or stators.
 Fig. 4 Sizing Function (Input screen, <left> and Results <right>)
Push the Sizing button on the Main Window and it will open the Input screen. Define the desired output (W) and, if necessary, specify the maximum motor outer diameter (mm) and maximum motor stack length (mm) as necessary to act as controlling functions and then calculate the size.
Confirm motor properties instantaneously
Just inputting design parameters into JMAG-Express Public instantaneously calculates motor properties. For DC brush motors, you can instantaneously obtain such motor properties as the induced voltage constant, torque constant, current vs. torque properties revolution speed vs. torque properties and iron loss/copper loss properties.
Instantaneous confirmation of motor properties enables simple adjustments to satisfy detailed requirements. For example, you're satisfying requirements for rotation of 10,000 RPM and output of at least 50W, but you haven't made it to your required start-up torque of 250mNm. And you can only make your start-up current from the motor geometry 30A.
You think about increasing the number of coil turns to raise the start-up torque. But there's a limit to the number of winds that can be made in the stator slot, which means increasing the number of winds will decrease the maximum number of rotations. Inputting wire information, such as wire diameter, into JMAG-Express Public enables checking of the lamination factor within the slot, which means you can see the results of the revolution speed vs. torque properties while you make a simple decision on the number of coil turns (Fig. 5). For this case we will set the initial number of coil turns at 6 Turns, which means at a lamination factor of 26.2% there is still some room to move, so we can raise this to 8 Turns and increase the startup torque. Increasing to 8 Turns will design a motor that satisfies requirements (Fig. 6).
 Fig. 5 Winding Parameter Settings Screen
Winding parameter settings can be performed from the Winding tab in the Main Window. This time we set 6 Turns at a lamination factor of 26.2%, but changed this to 8 Turns with the objective of enhancing start-up torque.
 Fig. 6 Torque vs. Current Amplitude
Comparison of current vs. torque properties. Making 8 Turns at the same start-up current enabled us to obtain the start-up torque we needed to satisfy requirements.
Navigates through design change directions
If required specifications are not satisfied, it's not easy to decide which design parameter should be changed. If you're uncertain about which design parameter to change, the JMAG-Express Public sensitivity analysis is convenient. Just setting the desired motor properties in this function will indicate which design parameter has the greatest sensitivity (degree of impact) in terms of the desired result.
Say for example your objective is to reduce iron loss and want to investigate the sensitivity of each parameter in terms of iron loss. Our motor is set at 10,000 RPM and output of 50W, with iron loss and copper loss set at about the same levels. Next, conduct a sensitivity level for each design parameter that should be considered for lowering iron loss. The JMAG-Express Public sensitivity analysis will calculate sensitivity just by specifying either the physical quantity that will be the target function for the sensitivity check or the operation point that you would like to investigate. We will specify an iron loss target function this time, setting 10,000 PRM, 50W output and torque of 50mNm as the operation point (Fig. 7).
Number of turns and rated voltage are determined in the motor requirements and can't be changed, but try setting the sensitivity here to the second-highest level and changing the teeth width to lower iron loss. Iron loss will be decided by the extent of magnetic flux over time, so the teeth width where magnetic saturation poses a problem will see increased sensitivity. Widening the teeth width lowers the magnetic flux density and enables lower iron loss (Fig. 8). Of course, broadening the teeth width will cut the coil space and reduce the lamination factor, but we have already shown how easy it is to check the coil lamination factor in JMAG-Express Public (Fig. 5).
 Fig. 7 Sensitivity Analysis Settings and Sensitivity
Check sensitivity through the sensitivity analysis button on the Main Window. Iron loss sensitivity for each parameter is displayed here. The display shows sensitivity is high for the number of turns and teeth width.
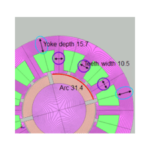
 Fig. 8 Changing Teeth Width
To reduce iron loss, broaden teeth width in accordance with the results of the sensitivity analysis. Changes in dimensions can easily be carried out through settings in the Geometry tab on the Main Window.
How to Get JMAG-Express Public
You can easily get a JMAG-Express Public license from our website. Follow the instructions below to get JMAG-Express Public.
- Download
Go to the JMAG-Express Public website page and download JMAG-Express Public. - Obtain a license key
Apply for a license from the same page from which you downloaded JMAG-Express Public. - Set the Installer and License Key
Install JMAG-Express Public and enter the e-mailed license key.
In Closing
JMAG-Express Public will continue improve and expand functions like it has done with the regard to the DC brush motors we referred to in this issue. JMAG-Express Public is freeware, so download it and give it a try.
(Tetsuya Hattori)
[JMAG Newsletter September, 2013]